Como embalar carne em um refrigerador com gelo seco (2025)
Atualizado: Agosto 27, 2025. Se você precisar de resultados congelados garantidos, aqui está como embalar carne em refrigerador com gelo seco-com segurança, passo a passo, e dimensionado para 24 a 72 horas. Mantenha os alimentos ≤40°F (congelado a ≤0°F), Vento de co₂, e use blocos embrulhados sobre uma barreira para que o frio caia como uma “chuva de neve” sobre sua carne.
O que você aprenderá sobre como embalar carne em um refrigerador com gelo seco
-
Layouts profissionais que realmente funcionam para caçadas, viagens rodoviárias, e restauração (principal, fundo, duas zonas).
-
Quanto gelo seco você realmente precisa, por tamanho mais frio, duração, e carga térmica.
-
Regras de companhias aéreas e remessas que você não irá falhar, incluindo o limite de passageiros de 2,5 kg.
-
Compatibilidade e segurança do refrigerador, então juntas, forros, e as pessoas ficam seguras.
-
Uma ferramenta de dimensionamento de 30 segundos + autoverificação para reduzir suposições em cada viagem.
Como embalar carne em refrigerador com gelo seco: segurança em primeiro lugar
Use blocos embrulhados acima da carga, adicionar uma barreira, embalar bem, e ventile o refrigerador - este é o mais seguro, método mais confiável. Mantenha os alimentos ≤40°F e os itens congelados ≤0°F; Nunca sele hermeticamente; manusear a -109°F com luvas isoladas. Estas etapas minimizam o risco de degelo e evitam problemas de pressão de CO₂.
Inglês simples por que funciona: pias frias. Uma camada superior “resfria” sua carne enquanto uma barreira corrugada ou de rack protege o forro contra queimaduras por congelamento. O empilhamento apertado remove bolsas de ar quente que “comem” gelo seco. Deixe um pequeno caminho de ventilação para que o gás escape – sem tampas inchadas, Sem surpresas.
Como embalar carne em refrigerador com gelo seco: PODO STEP -BY -STEP
Copie este fluxo de trabalho e você poderá repeti-lo, resultados congelados.
-
Confirme a compatibilidade. Use um refrigerador rígido rotomoldado aprovado para gelo seco; a maioria dos soft coolers não são.
-
Pré -Chill o refrigerador vazio e a carne. Horas gastas agora são horas economizadas depois.
-
Planejar ventilação. Nunca hermeticamente; quebre ligeiramente o ralo ou a tampa de acordo com as orientações da marca.
-
Proteção contra desgaste. Luvas isoladas e proteção para os olhos para manuseio a -109°F.
-
Adicione uma barreira. Cartão, uma cesta de fábrica, ou uma gradinha.
-
Carregar carne. Selado a vácuo, rotulado, empilhados firmemente com o mínimo de ar.
-
Coloque gelo seco. Por muito tempo: barreira → blocos embrulhados no topo; para acesso frequente, use um layout de pacote inferior.
-
Preencher lacunas. Toalhas, garrafas congeladas, ou pellets para remover bolsas de ar.
-
Fechar & sombra. Mantenha-se longe do sol direto; limitar aberturas.
-
Monitore a temperatura. Verifique na chegada; em caso de dúvida, jogue fora.
Caso real: Um refrigerador rígido pré-resfriado de 65 qt com blocos embrulhados de ~ 35 lb sobre carne de veado de ~ 30 lb permaneceu ≤10 ° F por 44 horas em temperatura ambiente de 90-94 ° F, com aberturas breves na tampa – comprovado em campo, desempenho em clima quente.
Gelo seco na parte superior ou inferior – o que é melhor?
Top-pack ganha por maior tempo de espera; duração das negociações do pacote inferior para acesso.
-
Pacote superior: carne → barreira → blocos embrulhados → toalhas para preencher lacunas.
-
Pacote inferior: barreira → blocos embrulhados → barreira → carne.
-
Duas zonas: divisor com gelo seco na metade; carne por outro; pacotes de gel estabilizam o lado de “acesso”.
| Escolha do pacote | Quando usar | Espera esperada | O que isso significa para você |
|---|---|---|---|
| Pacote superior | Viagens longas, aberturas mínimas | Mais longo | “Cachoeira fria” sobre carga |
| Pacote inferior | Acesso frequente | Mais curto | Agarre fácil, planejar reposição |
| Duas zonas | Carga mista | Médio | Acesso rápido sem aquecer o lado da carne |
Quanto gelo seco para refrigeradores de carne?
Regra prática: plano 5–10lb por 24h perda básica; para carne, começar 10–15 libras/dia (25–35 qt), 15–25 libras/dia (45–65 qt), 25–40 libras/dia (75–110 qt). Adicionar 25–40% no calor ou aberturas frequentes. Os blocos duram mais do que os pellets.
| Tamanho mais frio (Qt) | Carga de carne (Libra) | 24 h | 48 h | 72 h | O que isso significa |
|---|---|---|---|---|---|
| 25–35 | 10–20 | 10–15 lb. | 18–25 libras | 28–35 lb. | Fim de semana a dois |
| 45–65 | 20–40 | 15–25 libras | 25–40 lb. | 38–55 libras | Viagem em família; +25% no calor |
| 75–110 | 40–70 | 25–40 lb. | 40–65 libras | 60–90 libras | Caça/pesca |
| 120–150+ | 70–120 | 30–50 libras | 55–80 lb. | 80–120 libras | Restauração/grande colheita |
Exemplo: 65-qt, 48 h, carro quente → ~40 Libra. É assim que embalar carne em um refrigerador com gelo seco sem adivinhar.
Como embalar a carne em um refrigerador com gelo seco para voos e remessas?
Sim, você pode voar ou embarcar - mas siga as marcações, limites de peso, e ventando. NÓS. os passageiros podem transportar até 2.5 kg (5.5 Libra) de gelo seco por pessoa em ventilado pacotes com aprovação da companhia aérea e “Gelo seco/dióxido de carbono, sólido" marcação mais peso líquido ou “2,5 kg ou menos”. Para carga aérea, marca UN1845 e massa líquida; a embalagem deve ser ventilada. Combine gelo seco com pacotes de gel congelado para atrasos na triagem.
Como embalar carne em refrigerador com gelo seco: fundamentos de segurança
A ventilação não é negociável. CO₂ desloca o oxigênio; nunca use recipientes herméticos ou espaços sem ventilação. Use luvas isoladas e proteção para os olhos. Descarte deixando o gelo restante sublimar em uma área ventilada – nunca em pias ou recipientes lacrados. Verifique a temperatura na chegada com um termômetro de sonda; ≤40°F para alimentos frios, ≤0°F para congelados.
Quais refrigeradores funcionam melhor com gelo seco?
Resfriadores rígidos rotomoldados das principais marcas são normalmente compatíveis; a maioria dos soft coolers não são. Siga as orientações específicas do modelo, e quebre ligeiramente o ralo ou a tampa se a vedação estiver muito apertada para evitar pressão. Use uma barreira para proteger os revestimentos e retardar a sublimação.
Dicas práticas que salvam viagens
-
Pré -acertar tudo. O gelo seco deve manter, não criar, seu congelamento.
-
Blocos + Pellets. Use blocos para carga base; pelotas para preencher lacunas.
-
Dois refrigeradores em viagens longas. Um refrigerador de carne “não abrir”; um para itens de acesso rápido.
-
Sombra e fluxo de ar. Mantenha-se longe do sol; transportar em áreas ventiladas de veículos.
Dica de campo: Para cargas mistas, execute um duas zonas layout: gelo seco na metade, filés ou cortes do outro com pacotes de gel. Você abrirá o lado da carne com mais frequência sem prejudicar a vida do bloco.
2025 tendências que moldam como embalar carne em um refrigerador com gelo seco
Embalagem reutilizável, Monitoramento da IoT, Híbridos PCM, e CO₂ fornecem ventos favoráveis estão redefinindo o transporte congelado. Espere registradores conectados com melhores preços, inserções reutilizáveis padronizadas, e acesso mais fácil ao CO₂ graças a projetos de captura de carbono – úteis durante os períodos de pico.
Últimos desenvolvimentos de vista
-
Aumento de sistemas reutilizáveis: Caixas e inserções duráveis reduzem o desperdício e os custos ao longo do tempo.
-
IoT em todos os lugares: Adicione um registrador e receba alertas antes que ocorra um “degelo silencioso”.
-
PCM + híbridos de gelo seco: Suaves oscilações de temperatura e prolongam a retenção em cargas mistas.
-
Investimento na rede CO₂: Plantas regionais e projetos de CCS melhoram a disponibilidade.
Insight de mercado: O monitoramento e a embalagem da cadeia de frio mostram um crescimento plurianual até a década de 2030. Planejar melhor equipamento com menor custo unitário, não mais isopor.
Perguntas frequentes: como embalar carne em refrigerador com gelo seco
Como devo fazer camadas para uma fixação mais longa?
Pacote superior: carne no fundo, barreira, blocos embrulhados na parte superior - pias frias para fixação máxima.
Quanto tempo durarão 10 libras?
Cerca de 24h em um cooler rígido decente; adicione 25–40% para calor ou aberturas frequentes.
Posso voar com carne e gelo seco?
Sim. Até 2,5 kg por passageiro em um recipiente ventilado e rotulado para gelo seco, com massa líquida. Obtenha aprovação da companhia aérea.
Dano de gelo seco meu refrigerador?
Não se o modelo for classificado e você usar uma barreira. A maioria dos soft coolers não são compatíveis.
Devo misturar pacotes de gel com gelo seco?
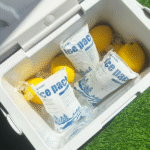
Sim. Os pacotes de gel estabilizam a zona de carne durante aberturas frequentes ou quando os blocos ficam baixos.
Estratégia de links internos (sugerido)
-
Lista de verificação de conformidade da cadeia de frio para pequenos expedidores de carne - /blog/lista de verificação de conformidade da cadeia fria
-
PCM vs.. gelo seco: melhor combo para embarques de carne — /blog/pcm-vs-gelo seco
-
Como escolher um registrador de dados de temperatura para refrigeradores — /blog/choose-temp-logger
-
ROI de transportadores isolados reutilizáveis para açougues e fazendas — /blog/reutilizáveis-shippers-roi
-
Pacote de viagem de caça: transporte de carne de veado SOP - /blog/venison-transport-sop
Impulsionadores de engajamento
Autoverificação interativa (Sim/Não):
-
Seu refrigerador é rotomoldado e classificação de gelo seco?
-
Você tem ≥10 libras/dia para um refrigerador de 45–65 qt?
-
Você fez Pré -Chill tanto mais frio quanto carne?
-
É o pacote ventilado e rotulado para viagens?
-
Você carrega um termômetro de sonda para verificar ≤40°F na chegada?
Pontuação: 5/5- você está pronto. 3–4/5 – revisar o POP. ≤2/5 – corrija as lacunas antes de mover a carne.
Resumo & Recomendações
Panorama geral: Para embale a carne em um refrigerador com gelo seco sem adivinhação, Pré -Chill, embalar bem, use blocos embrulhados sobre uma barreira, ventile o refrigerador, e dimensionar blocos com o 5–10lb/dia regra (adicione 25–40% para calor e acesso). Siga as marcações da companhia aérea/transporte e verifique a temperatura na chegada.
PRÓXIMOS PASSOS (CTA):
-
Cópia este SOP para sua próxima viagem.
-
Execute o estimador e compre blocos + um pequeno saco de pellets.
-
Adicionar um registrador e um kit de barreira para padronizar os resultados.
Precisa de um POP pronto para imprimir? Fale com um especialista em cadeia de frio Tempk para um modelo ajustado à rota.
Sobre Tempk
Ajudamos as equipes a transportar carnes e frutos do mar sensíveis à temperatura com segurança, simplesmente, e em conformidade. Nossos transportadores reutilizáveis, Pacotes PCM, e registradores de dados conectados fornecem resultados congelados sólidos com menos reembalagens. Os clientes relatam menos excursões e pacotes mais rápidos com nossos kits padrão. Quer um POP pronto para imprimir e adaptado às suas rotas? Entre em contato com a Tempk e otimizaremos sua embalagem para a temporada, duração, e perfil de carga.