Cómo usar la paquete de hielo seco de forma segura en 2025?
Si necesita un rendimiento congelado sin energía, aprendiendo Cómo usar la paquete de hielo seco La forma correcta es la victoria más rápida. El hielo seco se sienta a -78.5 ° C (−109.3 ° F), tan ventilando, dimensionamiento correcto (≈5–10 lb/24h), y el giro de manejo seguro 24–72h se mantiene de las conjeturas a una rutina. Aquí hay un libro de jugadas probado en el campo que puede solicitar hoy: en casa, en tránsito, o en el trabajo.
-
Cómo usar la paquete de hielo seco en enfriadores durante 24–72 h sin abuso de temperatura.
-
Cómo usar la paquete de hielo seco en vuelos (2.5 Límite de pasajeros de KG/5.5 lb, desfogue, calificación).
-
Cómo usar la manada de hielo seca para el comercio electrónico y los laboratorios (UN1845, Aquí está PI954, marcas de masa).
-
Secretos de dimensionamiento: cuanto comprar, donde colocarlo, bloques vs pellets.
-
Paquetes híbridos: Uso de gel/pcm y aislamiento VIP para reducir el riesgo y el peso.
Cómo usar la paquete de hielo seco en un refrigerador durante 24–72 horas?
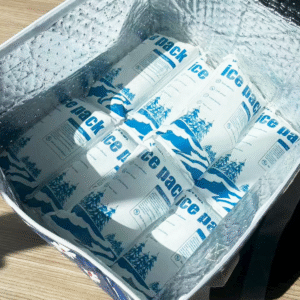
Respuesta central: Coloque los bloques envueltos sobre una barrera en la parte superior, empacar fuerte, y ventilación, luego verificar a ≤40 ° F (enfriado) o ≤0 ° F (congelado). Esta disposición explota el hundimiento de aire frío por más larga retención mientras protege los revestimientos y productos. Comience con 5–10 lb por 24h y agregue 25% en aberturas altas al calor o frecuentes.
Por que esto funciona para ti: El hielo seco se sublima al gas co₂ que se hunde. La colocación superior se baña el contenido en aire más frío, Las barreras evitan la "quemadura del congelador,"Y el refrigerador antes del refrigerador evita" desperdiciar "libras para enfriar el recipiente en sí. Usar duro, enfriadores de hielo seco; La mayoría de los enfriadores suaves no están calificados. Mantenga los contenedores ventilados, nunca herméticamente.
Top Vs. inferior Vs. lado: cómo usar diseños de paquete de hielo seco
Detalles que puede aplicar:
-
Top -back (Best Hold): Barrera → bloques envueltos → tapa.
-
Paquete de fondo (más acceso): Barrera → bloques envueltos → barrera → elementos.
-
Paquete lateral (dos zonas): Bloquea a lo largo de una pared para separar "congelados" y "bebidas".
Contenido previo a la pelea ("Hielo sacrificial" funciona), Use bloques como carga base, y llenar los vacíos para limitar los bolsillos de aire caliente.
| Diseño más frío | Cuando usar | Qué preparar | Lo que significa para ti |
|---|---|---|---|
| Top -back | Más larga bodega | Cartón/estante + bloques envueltos | Tiempo de ejecución máxima con menos libras |
| Paquete de fondo | Acceso frecuente | Dos barreras + bloques envueltos | Captura fácil; sujeción ligeramente más corta |
| Paquete lateral | Cargas mixtas | Panel espaciador + Bloques de lado | Zona congelada + zona fría |
Consejos prácticos que ahorran horas de frío
-
Pre -chill el refrigerador y los artículos para detener el derretimiento temprano.
-
Bloques de envoltura en papel para perder la pérdida y proteger los revestimientos.
-
Ventilación inteligente: Crkear un camino de drenaje/ventilación; Nunca es hermético.
-
Monitor con un termómetro de sonda a la llegada.
Caso real: Un enfriador de 65QT precedido con ~ 40 lb de bloques envueltos mantenidos temperaturas congeladas para ~ 48h en >90 ° F Ambient con aperturas limitadas. Los resultados varían según el enfriador y el manejo.
Cómo usar la paquete de hielo seco en vuelos (Qué reglas se aplican)?
Respuesta directa: Puede llevar hasta 2.5 kg (5.5 lb) por pasajero con aprobación de la aerolínea, en ventilado Paquete marcado "Dióxido de hielo seco/carbono, sólido,"Mostrar la cantidad neta. Esto se aplica al equipaje de transporte y revisado; Nunca use contenedores herméticos.
Lista de verificación (5- Pase de paso en el mostrador):
-
Confirmar la aprobación de la aerolínea.
-
Use un refrigerador/remitente duro ventilado.
-
Marca hielo seco y peso neto.
-
Mantenga a los documentos a mano.
-
Combina un pequeño hielo seco con paquetes de gel a retrasos en el puente.
¿Cuánto necesita y cómo usar matemáticas de dimensionamiento de paquetes de hielo seco??
Regla rápida: Plan 5–10 lb por 24h En refrigeradores duros de calidad; escala para el tamaño, calor, y aberturas de tapa. Usar bloques (pérdida más lenta) Como tu base; gránulos llenan los vacíos.
| Enfriador (QT) | ~ 24h | ~ 48h | ~ 72h | Lo que esto significa |
|---|---|---|---|---|
| 25–35 | 10–15 lb | 18–25 lb | 28–35 lb | Fin de semana para dos; aberturas mínimas |
| 45–65 | 15–25 lb | 25–40 lb | 38–55 lb | Viajes familiares; +25% en celo |
| 75–110 | 25–40 lb | 40–65 lb | 60–90 lb | Largo listones; Abierto raramente |
| Empezar aquí, luego ajusta a tu refrigerador, ambiente, y necesidades de acceso. |
Cómo usar la paquete de hielo seco con gel o PCM (paquetes híbridos)?
Mejor práctica: Apila las capas de frío: hielo seco en la parte superior para obtener una carga profunda, −21 ° C PCM Mid -llayer abrazando elementos sensibles, y gel de 0 ° C donde necesita acceso frecuente. Esto cojines se abre a las puertas y recorta libras totales. El aislamiento VIP reduce aún más la masa de refrigerante con más tiempo en rango.
Cuando brillan los híbridos (Usa estos patrones)
-
ÚLTIMA MILE con aperturas frecuentes: Hielo seco en la parte superior + −21 ° C Burbuja PCM + gel cerca de la tapa.
-
Vuelos limitados a 2.5 kg de hielo seco: Agregue gel/pcm para cubrir la última pierna después de la sublimación.
-
Productos que no deben congelarse: Saltar hielo seco; Use PCM/gel sintonizado para 2–8 ° C solo.
Qué importan más las reglas de seguridad cuando usa una paquete de hielo seco?
No negociables:
-
Ventilación: Nunca es hermético; presión y co₂ pueden construir.
-
PPE: guantes aislados + protección para los ojos; nitrilo solo no es suficiente.
-
Seguridad alimentaria: Verificar ≤40 ° F (enfriado) y ≤0 ° F (congelado) a la llegada.
-
Desecho: Deje que el hielo seco restante sublimate en un área ventilada.
-
Exposición de co₂: Conocer límites (TWA 5,000ppm; Mancha 30,000ppm).
Mano en "cheque listo" (anotar)
-
Contenedor ventilado listo?
-
Dimensionamiento a 5–10 lb/24 h (+factor de calor)?
-
PPE lleno (guantes/protección para los ojos)?
-
Marcas de vuelo/2.5 kg confirmado (Si vuela)?
-
Termómetro de sonda para la verificación de llegada?
5/5 = listo; 3–4/5 = revisión de SOP; ≤2/5 = arreglar antes de ir.
2025 Tendencias que dan forma a cómo usar paquete de hielo seco
¿Qué hay de nuevo este año?: La seguridad del suministro de CO₂ está evolucionando a medida que la escala de proyectos de captura de carbono; Northern Lights inyectó su primer CO₂ y se dirige al crecimiento de la capacidad de 2028. Los cargadores VIP y los PCM sintonizados siguen mejorando, que significa menos refrigerante para el mismo tiempo de ejecución. Planifique con anticipación para la opresión estacional y el suministro seguro temprano para las vacaciones/olas de calor.
Último progreso de un vistazo
-
CCS va en vivo: El almacenamiento europeo temprano agrega resiliencia a las redes de CO₂ regionales.
-
Reloj de suministro: Espere bolsillos de rigidez; La sincronización de la adquisición es importante.
-
Embalaje más inteligente: personaje + PCM le permite usar cargas más pequeñas de hielo seco con resultados iguales.
Insight del mercado: Si tu SLA es estricto, Diseñar con una copia de seguridad de PCM y temperaturas de registro; Reduce el riesgo de excursión y el gasto de refrigerante.
Preguntas frecuentes
Q1: ¿Puedo poner una paquete de hielo seco en mi maleta??
Si, arriba a 2.5 kg (5.5 lb) por pasajero, en ventilado Paquete marcado con cantidad neta. Obtenga la aprobación de la aerolínea primero.
Q2: ¿Cuánto tiempo durará en un refrigerador??
Plan 5–10 lb por 24h En un refrigerador duro de calidad; Agregue más para aberturas frecuentes y de alto calor y frecuentes.
Q3: ¿Puedo almacenar hielo seco en mi congelador??
No. Co₂ y el frío extremo pueden dañar los controles y la trampa de gas, no lo hagas.
Q4: ¿Es seguro agregar hielo seco a las bebidas??
No lo ingieran ni lo coloque en bebidas que consumirá. Déjalo sublimate antes del servicio.
Q5: ¿Qué PPE debería usar??
Guantes aislados y protección para los ojos; manejar solo en espacios ventilados.
Resumen & recomendaciones
Control de llave: Para dominar Cómo usar la paquete de hielo seco, respiradero, envoltura, y verificar. Usar bloquea las barreras, tamaño 5–10 lb/24h (Agregar factor de calor), seguir 2.5 Límites de vuelo de KG, y temperatura de llegada de registro (≤40 ° F/≤0 ° F). Hibridarse con Gel y considerar personaje para reducir el peso y el riesgo.
Siguientes pasos (CTA):
-
Usar el 30A segundo dimensionamiento arriba para su próximo paquete.
-
Agregar un Logger de sonda y a −21 ° C Capa PCM Si las puertas se abren a menudo.
-
Necesita un SOP específico de ruta? Habla con Tempk—El diseñaremos, tamaño correcto, y validar su paquete.
Acerca de Tempk
Ayudamos a los equipos a mover los bienes sensibles a la temperatura de manera segura y simplemente. Nuestros cargadores reutilizables, Paquetes de PCM sintonizados (−21 ° C, 2–8 ° C, CRT), y los registradores de datos conectados aumentan el tiempo en el rango mientras reducen el peso del refrigerante. Los clientes informan menos excursiones y paquetes más rápidos utilizando kits estándar validados en nuestro laboratorio térmico.
Vamos a optimizar tu carril: Solicite una hoja de trabajo SOP y calcón de hielo seco.