Wenn Sie auf der Straße eine grundsolide, gefrorene Leistung benötigen, wissend wie man Trockeneis in einer Kühlbox richtig verwendet ist der schnellste Weg, den Inhalt 24–72 Stunden lang unter Null zu halten. Verwenden Sie eine sichere Entlüftung, Kühlen Sie die Box vor, Topload-Blöcke, und Größe 5–10 lb per 24 Std. für typische Hardkühler. Sie erhalten eine klare Schritt-für-Schritt-Anleitung, ein Taschenrechner, und Packlayouts, die Sie auf jeder Route wiederholen können.
-
So verwenden Sie Trockeneis in einer Kühlbox Schritt für Schritt richtig So bleiben die Temperaturen unter Null und die sichere Entlüftung bleibt erhalten.
-
Wie viel Trockeneis Sie tatsächlich benötigen mit einem Schnellrechner und getesteten Größenbereichen.
-
Welche Kühler sind kompatibel und belüftet? Daher baut sich nie Druck auf.
-
So reisen und entsorgen Sie sicher ohne CO₂-Gefahren oder Nichtbeförderung zu riskieren.
-
Was ist neu in 2025 über Kühlkettenausrüstung und Best Practices.
So verwenden Sie Trockeneis richtig in einer Kühlbox, Schritt für Schritt?
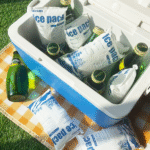
Kurze Antwort: Vorschreibe, Tragen Sie isolierte Handschuhe/Augenschutz, Laden Sie Gegenstände fest, Legen Sie Trockeneis darauf, seitliche Hohlräume füllen, und sorgen Sie für einen Entlüftungsweg – verschließen Sie ihn niemals luftdicht. Diese Anordnung treibt die Kälte nach unten und verhindert den Druckaufbau durch CO₂-Gas. Beschriften Sie, wenn Sie reisen, und Bühne/Transport in belüfteten Bereichen.
Warum funktioniert das: Trockeneis liegt bei −78,5 °C und sublimiert zu CO₂, das entweichen muss. Die Platzierung an der Spitze nutzt die Schwerkraft aus – die Kälte sinkt – sodass die „Eiskappe“ dichte Kälte über Ihre Nutzlast verteilt. Eine dichte Packung reduziert warme Stellen und verlangsamt die Sublimation. Ein normaler Deckelverschluss (nicht abgeklebt) Bewahrt den vorgesehenen Entlüftungsweg bei vielen Festplattenkühlern.
Welche Schichtung funktioniert am besten, um Trockeneis in einer Kühlbox richtig zu verwenden??
Verwenden Sie einen vierschichtigen Stapel, den Sie in fünf Minuten aufbauen können. Wickeln Sie die Blöcke in Kraftpapier oder Handtücher ein, Für eine gleichmäßige Abdeckung gemischte Pellets hinzufügen, und Lücken füllen, um Heißluftlecks zu verhindern. Das wie man Trockeneis in einer Kühlbox richtig verwendet Stapelwaagen halten die Zeit und sind während der Fahrt leicht zugänglich.
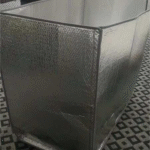
| Lagenplan (Kühlerstapel) | Was zu verwenden ist | Typische Dicke | Was es für Sie tut |
|---|---|---|---|
| Basisaufstrich | Pellet-/Brockenmischung in Papier eingewickelt | 0.5–1 Zoll | Verteilt die Kälte gleichmäßig über den Boden und ermöglicht so ein schnelles Abziehen. |
| Nutzlastzone | Artikel dicht verpackt | - | Schneidet Lufteinschlüsse; verlangsamt die Erwärmung, wenn Sie den Deckel öffnen. |
| Seitenfüllung | Kleine Pelletbeutel / zerknittertes Papier | 0.5–1 Zoll | Schützt vor seitlichem Wärmeaustritt und Stößen. |
| Obere Kappe | 1–2 Trockeneisblöcke + Pellets | 1–2 in | Füttert am längsten kalt nach unten; am einfachsten wieder aufzufüllen. |
Praktische Tipps & Schnelle Siege
-
Vorschreibe die Kühlbox mit Opfereis oder in einem Gefrierschrank für ein paar Stunden.
-
Handschuhe + Augenschutz (locker sitzend, isoliert) Vermeiden Sie Hautkontakt und Spritzgefahr.
-
Kleben Sie den Deckel nicht mit Klebeband fest– Lassen Sie den Entlüftungsweg des Herstellers intakt.
-
Zerbrich ein Fenster in Fahrzeugen; Vermeiden Sie enge Räume und Zeltinnenräume.
Real -World -Fall: Ein 65-qt-Festkühler für einen 36-Stunden-Sommertransport 16 lb (Blöcke + Pellets), Toplader, mit minimalen Öffnungen. Der Inhalt blieb hartgefroren; Der Abfluss-/Entlüftungsweg blieb frei.
Wie viel Trockeneis benötigen Sie, um Trockeneis richtig in einer Kühlbox zu verwenden??
Faustregel: Plan 5–10 lb pro 24 Std. in einem typischen isolierten Hartkühler. Blöcke dauern länger als Pellets; Hitze, dünne Wände, und häufiges Öffnen des Deckels erhöht die Nachfrage. Beginnen Sie im mittleren Bereich und fügen Sie bei heißem Wetter einen Puffer hinzu.
Warum die Reichweiten variieren: Die Sublimation hängt von der Isolierung ab, Füllverhältnis, Umgebungstemperatur, Luftstrom, und Zugriffshäufigkeit. Eine kleine Änderung des Luftstroms kann den CO₂-Ausstoß stark erhöhen – ein weiterer Grund, konservativ zu planen und die Lüftungsöffnungen offen zu halten.
Schnellrechner: Planen Sie, wie Sie Trockeneis in einer Kühlbox richtig verwenden
In Tabellen/Excel einfügen und Faktoren nach Bedarf anpassen:
-
Rate_lb_per_day: fangen Sie an 7.5 (Mittelpunkt von 5–10).
-
Umgebungsfaktor: 1.0 Cool | 1.2 warm | 1.4 heiß.
-
Cooler_Factor: 0.9 Premium rotationsgeformt | 1.0 Standard hart | 1.2 dünnwandig/weich.
Beispiel: 36 H, heiß (1.4), Standard hart (1.0) → 16 lb.
| Kühlervolumen | Füllstand | Stundenziel | Ost . Trockeneis | Was es für Sie bedeutet |
|---|---|---|---|---|
| 20–35 qt | 70–90 % | 18–24 h | 5–8 lb | Kurzstreckenfahrten/Tailgates; Für beste Ergebnisse vorkühlen. |
| 45–65 qt | 80–100 % | 24–36 h | 10–16 lb | Ein- bis zweitägige Roadtrips; kopflastiges Layout bevorzugt. |
| 65–85 qt | 80–100 % | 36–48 h | 15–22 Pfund | Wochenendcamping; Gruppieren Sie Elemente, um die Deckelzeit zu begrenzen. |
| 100+ Qt | 85–100 % | 48–72 h | 25–35 lb | Lange Strecken/heißes Wetter; Fügen Sie eine Seitenfüllung hinzu und beschriften Sie sie deutlich. |
| Notiz: 1 Pfund Trockeneis = ~250 L CO₂– Entlüften ist nicht optional; Es ist kritisch. |
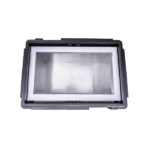
Ist Ihre Kühlbox kompatibel – und wie bestätigen Sie die Entlüftung??
Kurze Antwort: Verwenden Sie einen Trockeneis-kompatiblen Hartkühler; Viele sind so konzipiert, dass sie standardmäßig leicht entlüften. Softkühler sind oft nicht kompatibel. Bestätigen Sie Ihr genaues Modell, Dichtungen prüfen, Vermeiden Sie es, Abflüsse zu verstopfen, Und niemals Lüftungsschlitze oder Nähte verändern oder zukleben.
Was „kompatibel“ bedeutet: Materialien und Dichtungen vertragen kryogene Kälte; Dichtungen und Abflüsse lassen CO₂ entweichen; Auf spröde Kunststoffe und Glas wird verzichtet. Eine schnelle Überprüfung der Vernunft: Auf der Modellseite wird die Verwendung von Trockeneis erwähnt, Der Deckel schließt normal (undicht), und Abflusswege bleiben offen.
Fliegen? Wie man Trockeneis in einer Kühlbox im Flugzeug richtig verwendet
Verwenden Sie von der Fluggesellschaft zugelassene Verpackungen. UNS. Die Passagierregeln begrenzen Trockeneis auf 2,5 kg (5.5 lb) pro Reisender, eine Entlüftung erfordern (keine luftdichten Verschlüsse), und klare „Trockeneis/UN1845“-Kennzeichnung mit Nettomenge. Erwarten Sie, dass die Agenten das Gewicht überprüfen, Markierungen, und Deckelverschluss. Informieren Sie sich vor der Abreise stets über die Einzelheiten Ihres Transportunternehmens.
So verwenden Sie Trockeneis richtig in einer Kühlbox für Lebensmittel & Getränke?
Kurze Antwort: Bewahren Sie gefrorene Gegenstände möglichst nah an der Trockeneiskappe auf mit einer Papierumhüllungsbarriere; Platzieren Sie gekühlte Gegenstände weiter entfernt oder durch eine Trennwand getrennt. For mixed loads, Legen Sie einen kleinen Puffer aus normalem Eis unter die Trennwand, um empfindliche Gegenstände vor dem Überfrieren zu schützen.
Warum funktioniert es: Die obere Kappe leitet die Kälte zunächst durch das gefrorene Gut nach unten; Eine Trennwand reduziert den Gefrierbrand bei zerbrechlichen Verpackungen. Gruppieren Sie sie nach „Tag der Nutzung“, um die Suchzeit und das Öffnen des Deckels zu reduzieren. Wickeln Sie Blöcke ein, um Etiketten und Finger zu schützen, und verwenden Sie Tabletts oder Trennwände für Glas oder Gegenstände, die anfällig für Dellen sind.
Häufige Fehler bei der richtigen Verwendung von Trockeneis in einer Kühlbox
-
Jede Naht abkleben: Es fängt Gas ein und es besteht die Gefahr eines Bruchs – niemals luftdicht verschließen.
-
Innenlagerung in kleinen Räumen: CO₂ kann Sauerstoff verdrängen; In belüfteten Räumen aufbewahren.
-
Soft-Cooler-Shortcuts: Die meisten sind nicht für Trockeneis geeignet; Bleiben Sie bei kompatiblen Festplattenkühlern.
-
Trockeneis in Flaschen oder dünne Plastikbehälter füllen: Gefahr eines Thermoschocks/Splitters – vermeiden Sie diese vollständig.
2025 Aktualisierungen der Kühlkette: Was hat sich für Ihren Kühler und Ihr Trockeneis geändert?
Trendübersicht (2025): Modellierungsarbeiten verfeinerten Sublimationsschätzungen und zeigten, dass Luftstrom und Geometrie die täglichen Verlustraten stärker beeinflussen können, als Sie erwarten. Viele Festplattenkühler werden mittlerweile mit standardmäßigen Entlüftungsdesigns ausgeliefert, und die seit langem geltenden Regeln und Best Practices der Fluggesellschaften bleiben in Kraft – planen Sie konservativ und halten Sie den Entlüftungsweg offen.
Neueste Verbesserungen auf einen Blick
-
Bessere Sublimationsmodellierung hilft dabei, die richtige Masse und Belüftung für Ihre Route zu finden.
-
Standardbelüftete Hartkühler Reduzieren Sie Benutzerfehler durch übermäßiges Versiegeln.
-
Gemeinsam, einheitliche Reiseregeln Vereinfachen Sie die trägerübergreifende Planung.
Market insight: Erwarten Sie, dass Trockeneis-kompatible Hartkühler für den Versand von Lebensmitteln und Spezialitäten weiterhin zum Einsatz kommen, werden häufig mit einfachen Datenloggern kombiniert, um die Zeit-Temperatur-Leistung zu überprüfen. Planen Sie in heißen Monaten 20–30 % zusätzliche Masse ein, um Öffnungen und Verzögerungen abzudecken.
FAQ
Q1: Wie lange wird das Eis in einem Kühler trocknen??
Planen 5–10 lb per 24 Std. in einem typischen harten Kühler; Blöcke dauern länger als Pellets. Heißes Wetter und häufige Öffnungen verkürzen die Wartezeit.
Q2: Soll ich oben oder unten Trockeneis auftragen??
Das Oberteil hält in der Regel länger, da die Kälte sinkt. Das Laden von unten ist praktisch für schnelles Greifen, erwartet aber eine schnellere Sublimation.
Q3: Kann ich in der Nähe einer Kühlbox mit Trockeneis schlafen??
Tun Sie dies nicht in Zelten oder kleinen Räumen. CO₂ kann Sauerstoff verdrängen. Verwenden Sie nur gut belüftete Bereiche.
Q4: Kann ich mit einer Kühlbox und Trockeneis fliegen??
Ja – im Rahmen der Betreiberregeln. Typisches Passagierlimit ist 2.5 kg pro Person, markiert, und entlüftet (undicht).
Q5: Wie entsuche ich das übrig gebliebene Trockeneis??
Lassen Sie es an einem belüfteten Ort sublimieren (wenn möglich im Freien). Niemals in Waschbecken oder verschlossenen Behältern.
Zusammenfassung & Empfehlungen
Key Takeaways: Zu Verwenden Sie Trockeneis ordnungsgemäß in einer Kühlbox, Vorschreibe, PSA tragen, Von oben zu ladende, gewickelte Blöcke, Hohlräume füllen, Und niemals luftdicht versiegeln. Größe Masse bei 5–10 lb/Tag, Fügen Sie einen Puffer für heißes Wetter hinzu, und den Entlüftungsweg offen halten. Für Reisen, Markieren und überprüfen Sie die Anforderungen des Spediteurs.
Nächste Schritte (Dein Plan):
-
Bestätigen Sie die Kompatibilität des Kühlers und kühlen Sie ihn heute Abend vor.
-
Verwenden Sie den Rechner, um die Masse zu ermitteln; hinzufügen 20% bei Hitze oder häufigem Zugriff.
-
Packen Sie den vierschichtigen Stapel ein und führen Sie einen Heimversuch durch.
-
Reisen? Markieren Sie „Trockeneis/UN1845“ und lassen Sie es belüftet, und PSA tragen.
Über Tempk
Wir sind ein praxisorientiertes Kühlkettenteam, validierte Methoden für den Tiefkühl- und Kühltransport. Wir entwickeln praxiserprobte Kühlersätze, Schreiben Sie klare SOPs, und liefern Sie Größentabellen, damit Ihr Kühler beim ersten Versuch funktioniert. Unsere Leitlinien richten sich nach den EHS- und Betreibervorschriften, und bei der Auswahl unserer Verpackungen steht die Sicherheit im Vordergrund, kosten, und Produktqualität.
CTA: Bereit, Rätselraten auszuräumen? Kontaktieren Sie Tempk für eine 15-Minuten-Kühlung + Überprüfen Sie Trockeneis und erhalten Sie eine individuelle Karte für Ihre nächste Route.