So verwenden Sie Trockeneisbeutel sicher in 2025?
Wenn Sie gefrorene Leistung ohne Strom benötigen, Lernen wie man Trockeneisbeutel verwendet Der richtige Weg ist der schnellste Sieg. Trockeneis hat eine Temperatur von −78,5 °C (–109,3 ° F.), also entlüften, Richtige Größe (≈5–10 Pfund/24 Stunden), und die sichere Handhabung machen 24- bis 72-Stunden-Haltevorgänge vom Rätselraten zur Routine. Hier ist ein praxiserprobtes Playbook, das Sie noch heute anwenden können – zu Hause, unterwegs, oder bei der Arbeit.
-
So verwenden Sie Trockeneisbeutel in Kühlboxen für 24–72 Stunden ohne Temperaturmissbrauch.
-
So verwenden Sie Trockeneisbeutel auf Flügen (2.5 Maximale Höchstzahl von 5,5 Pfund pro Passagier, Entlüftung, Markierung).
-
So verwenden Sie Trockeneisbeutel für E-Commerce und Labore (UN1845, Hier ist PI954, Nettomassemarkierungen).
-
Geheimnisse der Größenbestimmung: wie viel zu kaufen, wo man es platzieren soll, Blöcke vs. Pellets.
-
Hybrid-Packouts: Verwendung von Gel/PCM und VIP-Isolierung zur Risiko- und Gewichtsreduzierung.
So verwenden Sie einen Trockeneisbeutel 24–72 Stunden lang in einer Kühlbox?
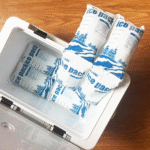
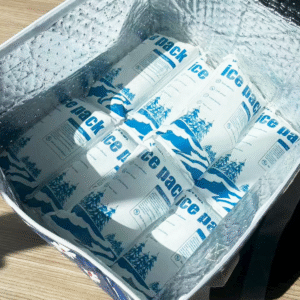
Kernantwort: Legen Sie eingewickelte Blöcke über eine Barriere oben, Pack fest, und entlüften – dann bei ≤40 °F überprüfen (gekühlt) oder ≤0°F (gefroren). Diese Anordnung nutzt die absinkende Kaltluft für den längsten Halt und schützt gleichzeitig Einlagen und Produkte. Beginnen Sie mit 5–10 Pfund pro 24 Stunden und fügen Sie hinzu 25% bei großer Hitze oder häufigem Öffnen.
Warum das für Sie funktioniert: Trockeneis sublimiert zu CO₂-Gas, das absinkt. Durch die Platzierung oben wird der Inhalt in kältere Luft getaucht, Barrieren verhindern „Gefrierbrand“.,Und durch das Vorkühlen des Kühlers wird vermieden, dass Pfunde für die Kühlung des Behälters selbst „verschwendet“ werden. Hart verwenden, Trockeneis-zugelassene Kühler; Die meisten Soft Cooler sind nicht bewertet. Halten Sie Behälter belüftet – niemals luftdicht.
Oben vs. unten vs. Seite – wie man Trockeneisbeutel-Layouts verwendet
Details, die Sie anwenden können:
-
Top-Pack (Bester Halt): Barriere → umwickelte Blöcke → Deckel.
-
Bodenpackung (mehr Zugang): Barriere → umwickelte Blöcke → Barriere → Gegenstände.
-
Beipack (zwei Zonen): Blöcke entlang einer Wand, um „Gefrorenes“ und „Getränke“ zu trennen.
Inhalte vor dem Schleifen („Opfereis“ funktioniert), Blöcke als Grundlast verwenden, und Hohlräume füllen, um Warmlufteinschlüsse zu begrenzen.
| Kühleres Layout | Wann zu verwenden | Was vorbereiten | Was es für Sie bedeutet |
|---|---|---|---|
| Top-Pack | Längster Halt | Karton/Gestell + umwickelte Blöcke | Maximale Laufzeit mit weniger Pfund |
| Bodenpackung | Häufiger Zugriff | Zwei Barrieren + umwickelte Blöcke | Einfach zu greifen; etwas kürzerer Halt |
| Beipack | Gemischte Beladungen | Distanzplatte + Blöcke auf der Seite | Gefrorene Zone + Kühlzone |
Praktische Tipps, die stundenlange Kälte ersparen
-
Vorschreibe den Kühler und Gegenstände, die ein vorzeitiges Schmelzen verhindern sollen.
-
Wickelblöcke in Papier, um den Verlust zu verlangsamen und die Liner zu schützen.
-
Clever entlüften: Einen Abfluss-/Entlüftungsweg knacken; Niemals luftdicht.
-
Monitor bei Ankunft mit einem Einstichthermometer ausgestattet.
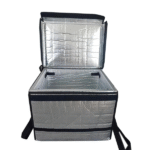
Wirklicher Fall: Ein vorgekühlter 65qt-Kühler mit ca. 40 Pfund verpackten Blöcken hielt die Gefriertemperatur ca. 48 Stunden lang aufrecht >90 °F Umgebungstemperatur mit begrenzten Öffnungen. Die Ergebnisse variieren je nach Kühler und Handhabung.
So verwenden Sie Trockeneisbeutel auf Flügen (welche Regeln gelten)?
Direkte Antwort: Sie dürfen bis zu 2,5 kg mitnehmen (5.5 lb) pro Passagier mit Genehmigung der Fluggesellschaft, in a entlüftet Paket mit der Aufschrift „Trockeneis/Kohlendioxid, solide,” Nettomenge anzeigen. Dies gilt für Handgepäck und aufgegebenes Gepäck; Verwenden Sie niemals luftdichte Behälter.
Profi-Checkliste (5-Schrittpass an der Theke):
-
Bestätigen Sie die Genehmigung der Fluggesellschaft.
-
Verwenden Sie einen belüfteten Hartkühler/Versandbehälter.
-
Markieren Trockeneis und Nettogewicht.
-
Halten Sie Dokumente griffbereit.
-
Kombinieren Sie kleines Trockeneis mit Gel-Packs, um Verzögerungen zu überbrücken.
Wie viel benötigen Sie – und wie berechnen Sie die Größe von Trockeneisbeuteln??
Schnelle Regel: Planen 5–10 Pfund pro 24h in hochwertigen Hartkühlern; Maßstab für Größe, Hitze, und Deckelöffnungen. Verwenden Sie Blöcke (langsamerer Verlust) als Ihre Basis; Pellets füllen Lücken.
| Kühler (Qt) | ~24 h | ~48 h | ~ 72H | Was bedeutet dies |
|---|---|---|---|---|
| 25–35 | 10–15 Pfund | 18–25 Pfund | 28–35 Pfund | Wochenende zu zweit; minimale Öffnungen |
| 45–65 | 15–25 Pfund | 25–40 Pfund | 38–55 Pfund | Familienreisen; +25% in Hitze |
| 75–110 | 25–40 Pfund | 40–65 Pfund | 60–90 Pfund | Lange Strecken; selten öffnen |
| Beginnen Sie hier, Passen Sie es dann an Ihren Kühler an, Ambient, und Zugangsbedürfnisse. |
So verwenden Sie einen Trockeneisbeutel mit Gel oder PCM (Hybrid-Packouts)?
Best Practice: Stapeln Sie die Kälte wie Schichten: Trockeneis darauf zum Tiefgefrieren, −21 °C PCM-Mittelschicht, die empfindliche Gegenstände umschließt, und 0°C-Gel, wo Sie häufig darauf zugreifen müssen. Dadurch werden Türspitzen abgefedert und das Gesamtgewicht reduziert. Die VIP-Isolierung reduziert die Kältemittelmasse bei längerer Reichweite weiter.
Wenn Hybriden glänzen (Verwenden Sie diese Muster)
-
Letzte Meile mit häufigen Öffnungen: Oben Trockeneis + −21 °C PCM-Blase + Gel in der Nähe des Deckels.
-
Flüge sind auf 2,5 kg Trockeneis begrenzt: Fügen Sie Gel/PCM hinzu, um das letzte Bein nach der Sublimation abzudecken.
-
Produkte, die nicht einfrieren dürfen: Verzichten Sie auf Trockeneis; Verwenden Sie abgestimmtes PCM/Gel nur für 2–8 °C.
Welche Sicherheitsregeln sind bei der Verwendung eines Trockeneisbeutels am wichtigsten??
Nicht verhandelbar:
-
Belüftung: Niemals luftdicht; Druck und CO₂ können entstehen.
-
PS: Isolierte Handschuhe + Augenschutz; Nitril allein reicht nicht aus.
-
Lebensmittelsicherheit: Stellen Sie sicher, dass ≤40°F liegt (gekühlt) und ≤0°F (gefroren) bei der Ankunft.
-
Entsorgung: Lassen Sie das restliche Trockeneis in einem belüfteten Bereich sublimieren.
-
Co₂ -Exposition: Grenzen kennen (TWA 5.000 ppm; Stel 30.000 ppm).
Praktischer „Ready-Check“ (punkten Sie selbst)
-
Belüfteter Behälter bereit?
-
Größe: 5–10 Pfund/24 Stunden (+Wärmefaktor)?
-
PSA verpackt (Handschuhe/Augenschutz)?
-
Flugmarkierungen/2,5 kg bestätigt (wenn fliegen)?
-
Einstichthermometer zur Ankunftskontrolle?
5/5 = bereit; 3–4/5 = SOP überprüfen; ≤2/5 = Reparieren Sie es, bevor Sie losfahren.
2025 Trends, die die Verwendung von Trockeneisbeuteln beeinflussen
Was ist neu in diesem Jahr: Die CO₂-Versorgungssicherheit entwickelt sich mit dem Umfang der Projekte zur Kohlenstoffabscheidung weiter; Northern Lights hat sein erstes CO₂ injiziert und strebt ein Kapazitätswachstum bis an 2028. VIP-Versender und optimierte PCMs werden immer besser, Das bedeutet weniger Kältemittel bei gleicher Laufzeit. Planen Sie im Voraus für saisonale Engpässe und stellen Sie die Versorgung für Feiertage/Hitzewellen frühzeitig sicher.
Neueste Fortschritte auf einen Blick
-
CCS geht live: Die frühe europäische Speicherung erhöht die Widerstandsfähigkeit regionaler CO₂-Netzwerke.
-
Versorgungsüberwachung: Es ist mit Engpässen zu rechnen; Der Zeitpunkt der Beschaffung ist wichtig.
-
Intelligentere Verpackungen: VIP + Mit PCM können Sie kleinere Trockeneisladungen mit gleichen Ergebnissen verwenden.
Market insight: Wenn Ihr SLA streng ist, Design mit PCM-Backup und Protokolltemperaturen; Es reduziert das Ausfallrisiko und den Kältemittelverbrauch.
FAQs
Q1: Kann ich einen Trockeneisbeutel in meinen Koffer stecken??
Ja – bis zu 2.5 kg (5.5 lb) pro Passagier, in a entlüftet Paket markiert mit Nettomenge. Holen Sie zunächst die Genehmigung der Fluggesellschaft ein.
Q2: Wie lange hält es in einer Kühlbox??
Planen 5–10 Pfund pro 24h in einem hochwertigen harten Kühler; Bei starker Hitze und häufigem Öffnen mehr hinzufügen.
Q3: Kann ich Trockeneis in meinem Gefrierschrank aufbewahren??
NEIN. CO₂ und extreme Kälte können die Steuerung beschädigen und Gas einschließen – tun Sie das nicht.
Q4: Ist es sicher, Getränken Trockeneis hinzuzufügen??
Nehmen Sie es nicht ein und geben Sie es nicht in Getränke, die Sie konsumieren. Lassen Sie es vor dem Servieren vollständig sublimieren.
Q5: Welche PSA soll ich verwenden??
Isolierte Handschuhe und Augenschutz; Nur in belüfteten Räumen handhaben.
Zusammenfassung & Empfehlungen
Key Takeaways: Zu meistern wie man Trockeneisbeutel verwendet, Entlüftung, wickeln, und verifizieren. Verwenden Blöcke über Barrieren, Größe 5–10 lb/24h (Wärmefaktor hinzufügen), folgen 2.5 kg Fluggrenzen, Und Ankunftstemperaturen protokollieren (≤40 °F/≤0 °F). Hybridisieren mit PCM/Gel und überlegen VIP um Gewicht und Risiko zu reduzieren.
Nächste Schritte (CTA):
-
Verwenden Sie das 30‑zweite Größe oben für Ihr nächstes Packout.
-
Fügen Sie a hinzu Sondenlogger und −21°C PCM-Schicht wenn Türen oft geöffnet werden.
-
Benötigen Sie eine routenspezifische SOP? Sprechen Sie mit Tempk– wir entwerfen, richtige Größe, und validieren Sie Ihre Verpackung.
Über Tempk
Wir helfen den Teams, die temperaturempfindlichen Waren sicher und einfach zu bewegen. Unsere wiederverwendbaren Versender, abgestimmte PCM -Packungen (–21 ° C., 2–8 ° C, CRT), und angeschlossene Datenlogger verlängern die Reichweite und reduzieren gleichzeitig das Gewicht des Kältemittels. Kunden berichten von weniger Ausfällen und schnellerem Auspacken mit Standard-Kits, die in unserem Thermolabor validiert wurden.
Lassen Sie uns Ihre Spur optimieren: Fordern Sie eine Trockeneis-SOP und ein Schnellkalkungs-Arbeitsblatt an.