Cara mengemas menggunakan es kering dengan aman 2025?
Jika Anda membutuhkan yang jelas, metode yang terbukti untuk cara mengemasnya menggunakan es kering, Panduan ini memberi Anda langkah yang tepat, aturan ukuran, dan cek kepatuhan yang bisa Anda percayai. Anda akan belajar dengan cepat, Paket yang aman, Formula Ukuran Mudah, Dan 2025 Persyaratan maskapai dan pengampunan tanah, Jadi produk beku dan dingin Anda tiba utuh dan tepat waktu.
-
Cara mengemas menggunakan es kering dengan sederhana, alur kerja langkah demi langkah
-
Cara mengukur es kering selama 24–72 jam dengan kalkulator cepat
-
Cara packing menggunakan dry ice untuk penerbangan dan pengiriman darat UN1845
-
Cara memadukan es kering dengan es gel/es biasa tanpa merusak barang
-
Bagaimana mengurangi risiko (luka bakar, Co₂ penumpukan) dengan pemeriksaan keamanan yang cepat
Mengapa memilih es kering—dan cara mengemas menggunakan es kering untuk produk Anda?
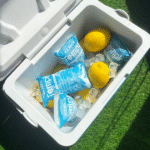
Es kering memberi Anda kekuatan yang sangat membeku tanpa air lelehan, Tapi paket Anda harus melampiaskan co₂ dan melindungi item dari kontak langsung. Dalam praktiknya, Anda akan membangun lapisan yang mengontrol aliran udara dan suhu sekaligus mencegah penumpukan tekanan. Gunakan yang kaku, wadah berisi es kering dan simpan kemasannya ventilasi—tidak pernah kedap bahan bakar.
Dari sudut pandang Anda: mulailah dengan tujuan produk Anda. Jika Anda harus menyimpan barang beku, gunakan balok yang lebih besar dan isian yang lebih rapat. Jika Anda hanya membutuhkan dinginkan suhu, gunakan lebih sedikit es kering dan buffer dengan kemasan gel. Apa pun yang terjadi, pilih wadah yang dapat menampung es kering dan rencanakan bukaan tutup minimal selama transit.
Beku vs. dinginkan: di mana Anda meletakkan es kering?
Untuk pembekuan beku: menempatkan blok di atas dan/atau di bawah beban dengan a pemisah (karton/rak kawat) untuk menghindari kontak langsung; penempatan atas memanfaatkan tenggelamnya udara dingin, penempatan bawah menstabilkan alas—banyak paket menggunakan keduanya.
Untuk pendinginan yang lembut: batasi satu blok kecil di salah satu sudut di bawah pemisah dan andalkan paket gel untuk meredam guncangan dingin.
| Tujuan Paket | Penempatan | Jenis Es | Apa artinya bagimu |
|---|---|---|---|
| Beku padat | Atas + dasar (dengan pemisah) | Blok (bertahan lebih lama) | Pull-down lebih cepat, waktu proses yang lebih lama, bahkan suhu |
| Beban campuran | Ice dasar kering + lapisan tengah gel | Blok + gel | Zona beku + zona dingin dalam satu kotak |
| Hanya dingin | Blok "sudut" kecil + banyak gel | Blok kecil + gel | Mencegah pembekuan barang sensitif |
Cara mengemasnya menggunakan es kering: daftar periksa langkah demi langkah
Urutan inti: memakai sarung tangan → pra-dinginkan → buat alas → tempatkan balok → tambahkan pemisah → muat produk → isi rongga → ventilasi → monitor. Ikuti perintah ini untuk melindungi wadah, menghindari luka bakar dingin, dan menjaga suhu tetap stabil.
Langkah -langkah (salin/tempel siap):
-
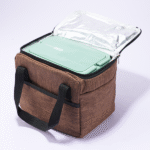
Konfirmasi kompatibilitas. Gunakan yang kaku, pendingin/pengirim dengan tingkat es kering; kebanyakan pendingin lunak tidak diberi peringkat.
-
Pra -chill. Dinginkan wadah dan isinya sebelum dimuat.
-
Kenakan APD. Sarung tangan terisolasi; pelindung mata jika memotong balok.
-
Buat basis. Karton bergelombang atau rak untuk mengangkat produk dari balok.
-
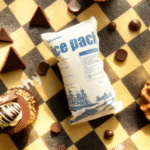
Tempatkan es kering. Lebih menyukai blok untuk umur panjang; bungkus dengan kertas untuk memperlambat sublimasi.
-
Tambahkan pemisah. Karton/handuk/keranjang kawat antara es dan produk.
-
Kemas dengan rapat. Isi kekosongan dengan handuk atau bungkus gel; udara dingin tenggelam.
-
Izinkan ventilasi. Jangan pernah menutup rapat gas; buka kaitnya atau gunakan saluran pembuangan berventilasi.
-
Memantau. Gunakan probe atau termometer min/maks di dalam beban.
Ukuran cepat: cara mengemasnya menggunakan es kering selama 24–72 jam
Aturan praktis:
-
Tahan beku: ~10–15 pon per 25 jumlah per 24 H
-
Tahan dingin: ~ 5–10 lb per 25 jumlah per 24 H
Blok bertahan lebih lama dari pelet; cuaca panas dan seringnya pembukaan meningkatkan kebutuhan.
Estimator siap pakai spreadsheet (pasta & menyesuaikan):
-
Faktor Sasaran: 1.0–1.5 (dinginkan) atau 2,0–2,5 (beku)
-
Faktor Kondisi: 0.8 (dingin/teduh), 1.0 (normal), 1.3–1.5 (panas/cerah)
| Ukuran yang lebih dingin & Sasaran | 24 H | 48 H | Apa artinya bagimu |
|---|---|---|---|
| 25 qt (beku) | 10–15 lb | 20–25 lb | Kinerja pembekuan akhir pekan |
| 50 qt (beku) | 20–30 lb. | 40–50 lb. | Keluarga/daging dijalankan |
| 25–50 qt (dinginkan) | 5–10 lb. | 10–20 lb | Minuman/susu ≤40°F |
Untuk tipnya: Pisahkan item yang sering diakses menjadi pendingin “penggunaan sehari-hari” kedua untuk melindungi cadangan utama yang dibekukan.
Cara mengemasnya menggunakan es kering untuk penerbangan dan perjalanan?
Anda dapat terbang dengan es kering dalam batasan yang ketat: ≤2,5kg (5.5 lb) per penumpang dan per paket, persetujuan operator, kemasan ventilasi, Dan tanda (“Es kering / Karbon dioksida, padat,” UN1845, massa bersih). Selalu konfirmasikan kebijakan maskapai Anda sebelum melakukan perjalanan.
Daftar periksa paket bandara:
-
Gunakan a pendingin keras berventilasi (tidak ada tutup styro yang tersegel).
-
Label: “Es kering / Karbon dioksida, padat,” UN1845, massa bersih (kg).
-
Tutupnya tetap terkunci tapi bukan kedap gas; mempertahankan ventilasi.
-
Bawalah rincian persetujuan maskapai penerbangan dengan tas Anda.
Kasus dunia nyata: Sebuah toko roti mengirimkan croissant beku ke luar negeri 20 lb di sebuah 40 qt pendingin plus rak kawat. Setelah 30 jam di dalam 84–95 ° F. ambient, suhu internal produk tetap di bawah 15° f, mengkonfirmasikan rantai beku yang utuh.
Cara packingnya menggunakan dry ice untuk pengiriman darat (UN1845)?
Untuk bidang jalan di A.S., es kering adalah “Karbon dioksida, padat,”UN1845, Kelas 9. Paket harus CO₂ WIND dan menjadi ditandai dengan massa bersih es kering; gunakan kotak luar yang kaku. Ketika segmen udara memungkinkan, jumlah kecil ≤2,5kg per paket dengan tanda yang diperlukan dikecualikan dari banyak persyaratan lainnya.
Pemeriksaan cepat kepatuhan (dapat dicetak):
-
Tanda UN1845, Nama pengiriman yang tepat, Dan massa bersih
-
Menggunakan ventilasi kemasan; tidak pernah kedap gas
-
Gunakan a bagian luar yang kaku kotak; tambahkan penyerap jika ada cairan
-
Sertakan deskripsi konten sederhana per kebijakan operator
Cara mengemasnya menggunakan es kering dengan gel pack atau es biasa?
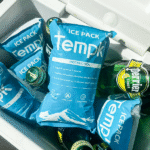
Pencampuran berhasil—dan sering kali merupakan hasil terbaik. Taruh es kering di bawah pemisah untuk bersantai dari bawah, Kemudian paket gel di atasnya untuk menyangga item yang tidak boleh dibekukan. Hal ini menciptakan zona beku dan dingin dalam satu wadah dan memperpanjang waktu proses secara signifikan.
Pengaturan praktis (kemenangan cepat)
-
Semua beku: blok di atas Dan dasar, pemisah antar lapisan
-
Beku + dinginkan: bagian bawah es kering → pemisah → produk → gel di atas
-
Hanya dingin: blok "sudut" kecil + banyak gel untuk dingin yang lembut
Keamanan pertama: cara mengemas menggunakan es kering tanpa resiko?
Dua bahaya mendominasi: suhu dingin yang ekstrim dan penumpukan CO₂. Memakai sarung tangan terisolasi, bekerja di berventilasi Area, Dan tidak pernah membuat paket kedap udara. Simpan makanan dingin ≤40°F (4° C.) dan gunakan termometer atau pencatat data untuk memverifikasi kinerja. Jangan menjebak pendingin ventilasi di bagasi mobil yang tertutup rapat.
Kiat pengguna dapat Anda terapkan hari ini
-
Memuat di rumah: Gunakan termometer probe dan catat min/maks setelah tiba.
-
Rute musim panas: Naungan pendingin dan tutup batas terbuka; lonjakan panas bersifat kumulatif.
-
Serah terima tim: Tambahkan instruksi satu halaman “re‑ice or not” dengan massa bersih yang ditandai.
Contoh Lapangan: Pendingin rotomolded 50‑qt dengan 25 lb blok yang dipegang di bawah 10° f untuk ~40 jam pada suatu 92° f hari dengan 8–10 tutup terbuka, meningkat menjadi ~28° f per jam ~52. Hasil bervariasi berdasarkan isolasi dan sinar matahari.
2025 perkembangan dan tren cara mengemas menggunakan es kering
Snapshot tren (2025): Permintaan es kering pada produk makanan tetap tinggi, farmasi, dan e -commerce, ketika volatilitas pasokan CO₂ menciptakan lonjakan harga musiman. Pengirim yang dapat digunakan kembali Dan Sistem PCM sedang melakukan penskalaan untuk jalur 2–8°C dan –20°C, mengurangi ketergantungan terhadap es kering ketika deep-freeze tidak diperlukan. Pembuat pelet di lokasi semakin berkembang untuk mengurangi risiko pasokan.
Kemajuan terbaru sekilas
-
Kejelasan perjalanan udara: Panduan FAA PackSafe memperkuat 2.5 kg batas dan aturan penandaan yang jelas; sebagian besar maskapai penerbangan menirunya.
-
Ringkasan PHMSA: Fokus kembali ventilasi Dan massa bersih penandaan untuk paket UN1845.
-
Sinyal keamanan pangan: Agensi menegaskan kembali ≤40°F ambang batas penahan dingin; menggunakan termometer alat.
Wawasan pasar: Harapkan pertumbuhan yang berkelanjutan 2032 sebagai peledakan, farmasi, dan barang-barang yang mudah rusak semakin meluas; pasokan tetap bersifat regional—rencana sumber lokal Dan kemungkinan.
FAQ
Berapa banyak es kering per hari yang saya butuhkan?
Rencana ~10–15 pon per 25 qt per 24 jam untuk beku, ~ 5–10 lb untuk dingin. Perbesar ukuran saat cuaca panas atau saat tutup sering dibuka.
Bisakah saya terbang bersamanya?
Ya-≤2,5kg (5.5 lb) per penumpang dan per paket, persetujuan maskapai penerbangan, kemasan ventilasi, dan penandaan yang tepat.
Akan mengeringkan es merusak pendingin saya?
Hanya jika tidak diberi peringkat. Banyak pendingin keras yang memungkinkan es kering; pendingin lunak seringkali tidak—periksa panduan pabrikan.
Haruskah saya meletakkan es kering di atas atau bawah?
Menggunakan atas untuk memanfaatkan tenggelamnya udara dingin; menggunakan dasar dengan pemisah untuk melindungi item dan menstabilkan pangkalan. Penempatan campuran biasa terjadi pada suhu genap.
Berapa ambang batas suhu dingin yang aman untuk makanan?
Simpan makanan dingin ≤40°F (4° C.); verifikasi dengan termometer atau logger di dalam beban.
Ringkasan & Rekomendasi
Poin -poin penting: Cara mengemasnya menggunakan es kering turun ke wadah yang diberi peringkat, blok + pemisah + Isi ketat + ventilasi, dan ukuran realistis. Verifikasi aturan maskapai/PHMSA saat Anda bepergian atau mengirim, dan simpan makanan dingin ≤40°F dengan pemeriksaan internal. Untuk muatan campuran, menggabungkan es kering dan paket gel untuk menciptakan zona beku dan dingin.
Langkah selanjutnya (rencana aksi):
-
Konfirmasikan wadah Anda nilai es kering.
-
Gunakan penaksir untuk mengukur blok untuk rute Anda.
-
Kemas berlapis-lapis dengan pemisah; mengisi kekosongan dengan rapat.
-
Lubang angin setiap saat dan tambahkan a termometer/logger.
-
Untuk rute yang rumit, permintaan a paket yang divalidasi dari Tempk.
Tentang tempk
Kami memadukan rekayasa rantai dingin dengan pengujian rute hingga desain paket berbasis data dan kalkulator untuk makanan yang mudah rusak, biofarmasi, dan barang khusus. Tim kami melacak pembaruan FAA/PHMSA dan panduan kontainer khusus merek sehingga Anda dapat memperolehnya saat ini, praktis instruksi yang mengurangi risiko pembusukan dan kepatuhan. Bicaralah dengan kami untuk rencana yang disesuaikan.