If you ship temperature-sensitive goods, a mailer insulated box is your simplest way to reduce spoilage and refunds. Many chilled items need 2–8°C (36–46°F), while many frozen items target below -18°C (0°F). In 2026, customers also expect less waste and clearer disposal instructions. This guide shows you how to choose the right mailer insulated box, pack it consistently, and add export-ready steps when you ship internationally.
This article will help you answer:
How a mailer insulated box holds temperature longer (and why warm spots happen)
How to estimate mailer insulated box temperature retention time for your lane
Which sustainable mailer insulated box materials work without raising failure risk
When to use gel packs, PCM, or dry ice for a mailer insulated box
How to validate and standardize pack-out so results stay consistent
What changes when you ship internationally (labels + documents + dry ice rules)
What is a mailer insulated box, and when do you need it?
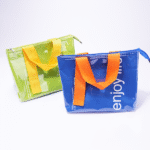
Direct answer: A mailer insulated box is a compact shipper that slows heat transfer so your product stays in range longer during transit. It combines insulation and structure in a mailer-friendly format. You use it when temperature drift can reduce product value. That includes food, pharma, diagnostics, cosmetics, and specialty ingredients.
A regular carton protects against bumps. It does not protect against heat. A mailer insulated box works like a “winter coat” for your shipment. It buys your coolant time to do its job. That time buffer is what protects your margin.
| Packaging option | Temperature protection | Moisture control | What it means for you |
|---|---|---|---|
| Regular corrugated carton | Low | Low | Higher risk on warm days |
| Carton + loose liners | Medium | Medium | Better, but gaps create warm spots |
| Mailer insulated box system | High | Medium–High | More consistent arrivals, fewer claims |
Practical tips you can use today
If you ship chilled items: Start with a mailer insulated box designed for 48 hours in warm weather.
If you ship frozen items: Plan for the slowest deliveries, not the average. Add buffer.
If you ship liquids: Add an absorbent layer so condensation does not destroy labels.
Real-world example: A subscription brand reduced “warm on arrival” complaints after moving from a liner-in-carton setup to a tighter mailer insulated box pack-out.
How does a mailer insulated box keep products in range?
Direct answer: A mailer insulated box slows heat gain (or heat loss) using insulation, trapped air, and reflective surfaces. Your coolant then absorbs the remaining heat load. If you control gaps and seams, the system becomes repeatable.
Think of temperature control as three levers. You rarely need all three maxed out. You just need the right balance for your lane.
The 3 principles that matter most
Thermal resistance: insulation slows heat flow.
Air entrapment: still air changes temperature slowly.
Radiant reflection: reflective layers reduce heat from sun exposure.
| Insulation feature | What it does | Typical materials | What it means for you |
|---|---|---|---|
| Air cells | Trap still air | foam, bubble structures | Slower temperature swing |
| Reflective layer | Reflect radiant heat | metallized film | Better hot-weather protection |
| Structural shell | Prevent crushing | corrugated board, molded shells | Fewer leaks and damage |
Why warm spots happen (and how you stop them)
Warm spots come from gaps, air channels, and leaky seams. Even a great mailer insulated box can fail if coolant is not placed consistently. Picture a window cracked open in summer. Cold escapes faster than you expect.
Fix the basics first:
Put coolant where the heat hits hardest (often top + sides).
Remove big side gaps.
Seal seams the same way every time.
How long should your mailer insulated box hold temperature for your lane?
Direct answer: Start with your worst-case delivery time, then add buffer for delays. Many e-commerce cold shipments design for 48 hours as a baseline. Multi-zone routes often need 72 hours. Export or customs exposure can push you toward 72–96 hours.
The best question is not “How long can a box hold?” It is “How long do you need it to hold on your slowest day?”
Mailer insulated box temperature retention time: a simple 3-step estimate
Set your lane time: best / typical / worst (in hours).
Set weather risk: mild / hot / extreme heat (by season and destination).
Pick a tier: standard / upgraded / high-performance, then test.
| Your shipping situation | Target hold time | Packaging tier to start | What it means for you |
|---|---|---|---|
| Local + 1–2 days | 48 hours | Standard mailer insulated box | Often enough with correct coolant |
| Multi-zone + 2–3 days | 72 hours | Upgraded insulation or more coolant | Adds buffer for variability |
| High heat + long routes | 72–96 hours | High-performance insulation + optimized coolant | Protects margin when delays happen |
Practical tips you can use today
Add 25% buffer time beyond your promised delivery window.
Assume one side sits in a warm truck or on a sunny porch.
Track the slowest 10% of deliveries. Those drive most complaints.
Which mailer insulated box materials work best in 2026?
Direct answer: The “best” material depends on your lane time, heat exposure, and disposal goals. In 2026, you also need to think about right-sizing and simpler recycling. A mailer insulated box that customers can dispose of easily often performs better in reviews, even when thermal performance is similar.
You do not want “eco” materials that cause spoilage. Product waste can be worse than packaging waste. So aim for balance: protect the product first, then improve materials and design.
| Insulation type | Typical strength | Typical trade-off | What it means for you |
|---|---|---|---|
| EPS-style foam systems | Good insulation, low cost | Recycling varies by area | Reliable start for many lanes |
| EPP systems | Durable, reusable | Higher upfront cost | Best for reuse programs |
| Paper-based insulation | Curbside-friendly in many areas | Needs more thickness | Great for short lanes / mild climates |
| Higher-performance panels | Strong hold time in smaller size | Higher material cost | Can reduce dimensional weight |
Practical selection tips
Short lanes: paper-based systems can work well and look premium.
Hot lanes: use higher-performance systems to reduce coolant waste.
Cost control: right-size first. Oversized boxes waste money fast.
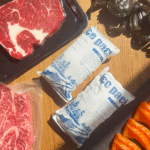
Gel packs, PCM, or dry ice: what coolant fits your mailer insulated box?
Direct answer: Choose coolant based on the temperature band you must protect, not on habit. Gel packs are simple for many chilled lanes. PCMs help protect “never freeze” items. Dry ice is strong for long frozen lanes, but it adds handling and labeling steps.
Your mailer insulated box is the “jacket.” Coolant is the “fuel.” If one is wrong, the system fails.
Summary and recommendations
A mailer insulated box protects temperature-sensitive shipments by slowing heat transfer and buying time. Your biggest wins come from matching insulation to lane time, choosing the right coolant, and packing the same way every time. Validate in hot and cold conditions, then standardize the pack-out with photos and a one-page SOP. If you ship internationally, add a lane profile and a document + label audit step to prevent delays.
What you should do next
List your top 3 lanes and their worst-case transit times.
Choose one mailer insulated box configuration per risk tier (48h / 72h).
Run a hot profile test plus a +24h delay test.
Lock the winning layout into a simple SOP your team can follow at 5 pm on a Friday.
Only then optimize cost (right-size, fewer parts, sustainable materials).
About Tempk
At Tempk, we build temperature-controlled packaging for real routes, not perfect lab days. We focus on validated performance, practical pack-out design, and material options that balance protection and sustainability. We also help teams standardize packing steps so results stay consistent across shifts and seasons.
Next step: Share your lane times, product temperature limits, and current pack-out. We’ll help you map the safest mailer insulated box setup for your highest-risk zone first.