WHY COLD CHAIN PACKOUT TEST DOCUMENTATION MATTERS
A cold chain packout test is only useful when another qualified person can understand what was tested, how it was configured, what conditions were applied, and why the result was accepted or rejected. A temperature curve without its payload, coolant arrangement, sensor locations, conditioning record, and environmental profile is not enough to reproduce or approve a shipment configuration.
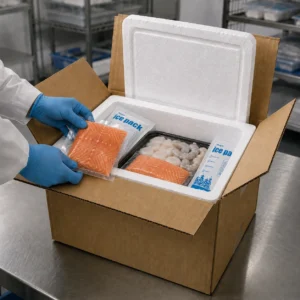
The purpose of packout validation is not simply to produce a graph. It is to determine whether a defined packaging configuration can support a defined shipment requirement under defined conditions. The result applies to the tested configuration and scope. It should not automatically be extended to another payload, box size, coolant quantity, route, season, or handling process.
A complete validation record connects six elements:
- Shipment requirement;
- Packout configuration;
- Conditioning and loading procedure;
- Test environment and handling profile;
- Sensor data and analysis;
- Decision, limitations, and approval.
This approach is particularly important for temperature-sensitive products because an apparently successful result can be misleading if the test does not represent the intended shipment. Tempk’s [Cold Chain Tools](https://www.tempcontrolpack.com/cold-chain-tools/) and [Packaging Selector](https://www.tempcontrolpack.com/cold-chain-tools/packaging-selector/) can support early configuration thinking, while a project-specific review is needed before a packout is approved for use.
Start With a Test Brief, Not a Test Curve
Before building the packout, prepare a test brief that states the question the test is intended to answer. A clear test question might be whether a specified payload and packout configuration can maintain the project-approved temperature range during a defined route exposure. It should not be written as a broad question such as “Can this box keep products cold?” because the answer would depend on too many undefined variables.
The test brief should include:
| Field | What to record | Why it matters |
| — | — | — |
| Test objective | The specific design or shipment question | Prevents testing without a decision purpose |
| Payload | Product type, quantity, mass, dimensions, and packaging | Defines the thermal load |
| Temperature requirement | Approved target range and excursion rules | Defines the acceptance basis |
| Planned exposure | Transit window, ambient profile, delays, and handling events | Makes the test relevant to the intended use |
| Packout version | Box, insulation, coolant, barriers, and loading layout | Allows the result to be traced to one configuration |
| Test owner | Person responsible for the record and coordination | Establishes accountability |
| Approval path | Engineering, quality, customer, or other review | Defines who can release the decision |
If the test is exploratory rather than a formal approval test, label it that way. Exploratory data can guide later design decisions, but it should not be presented as a completed validation result without a defined acceptance basis.
The test brief should also identify what the test does not answer. For example, a controlled thermal test may not represent every transport carrier, seasonal condition, customs delay, or delivery scenario. Recording those exclusions at the beginning prevents the final report from making claims outside the test scope.
Record the Complete Packout Configuration
The packout must be recorded as a complete system. Listing only the insulation type or coolant family is not enough. Small changes in payload arrangement, coolant placement, barriers, conditioning state, or closure method can change the thermal behavior.
Record at least the following:
- Outer carton or shipper format;
- Internal dimensions;
- Insulation material, structure, and relevant dimensions;
- Gel pack, PCM, dry ice, or other thermal-control component;
- Product or coolant model identifier, if applicable;
- Number, dimensions, and fill information of thermal-control components;
- Payload quantity, mass, dimensions, and arrangement;
- Separators, liners, trays, absorbent materials, or protective barriers;
- Placement of the payload relative to the thermal-control components;
- Lid, closure, tape, label, or sealing method;
- Packout configuration drawing or photographs;
- Configuration revision or version number.
A configuration drawing should show the orientation and relative position of the main components. If the layout is too complex for a single view, use a top view, side view, and cross-section. Each drawing should carry a revision identifier that matches the test record.
Photographs are useful when they show the actual tested arrangement. A generic product photograph or a conceptual diagram should be labelled as illustrative and should not be presented as proof that the configuration was tested. If a photograph includes customer information, shipment labels, or internal details, remove or anonymize those elements only in the publishable copy while retaining the original file in the controlled record.
Define Conditioning and Loading Before the Test
Conditioning is one of the most important variables in a cold chain packout test. A coolant component may behave differently depending on the conditioning equipment, starting state, duration, handling time, and loading sequence. These details must be recorded rather than summarized as “conditioned according to standard practice.”
The conditioning record should state:
- Which components were conditioned;
- Conditioning equipment or storage environment;
- Start date and time;
- End date and time;
- Starting and ending conditions, where measured;
- Time between removal from conditioning and packout closure;
- Handling conditions during that interval;
- Any deviation from the written procedure;
- Person responsible for confirming the conditioned state.
The loading record should explain the sequence from the first component placed to final closure. It should identify whether the payload was preconditioned, whether the product was loaded at a controlled temperature, and how direct contact with thermal-control components was prevented when required.
A repeatable loading instruction should allow another trained operator to build the same configuration without relying on memory. It should specify orientation, position, quantity, spacing, barriers, and closure checks. If the test is intended to represent a manual packing process, the report should record the actual process rather than replacing it with an idealized diagram.
No conditioning temperature, timing, fill weight, or operating value should be added to the public article unless the company has an approved source for that value. The method article can explain what must be recorded without inventing a universal instruction.
Define the Route and Environmental Exposure
A packout test should reflect the conditions it is meant to represent. A nominal transit duration is only one part of the exposure. The record should identify ambient conditions, controlled-storage segments, handoffs, loading or unloading delays, vehicle exposure, air transport, customs or warehouse waiting, and possible delivery exceptions.
Build the exposure profile around the shipment question:
- What is the planned transit duration?
- What additional delay is reasonably possible?
- Is the parcel exposed to high or low ambient conditions?
- Which steps are temperature controlled?
- Where could the package remain stationary?
- Could the parcel be opened, repacked, or handled outside the expected sequence?
- Which seasonal or regional conditions are in scope?
- Which conditions are explicitly outside the test scope?
The record should distinguish between an environmental chamber profile and a real-route simulation. A controlled chamber may provide a repeatable exposure, but it is not automatically identical to every field shipment. Likewise, a field shipment may reveal real handling variation but may be harder to reproduce. The chosen method should be documented with its purpose and limitations.
When route risk is uncertain, use a conservative and transparent description rather than an unsupported claim. The goal is to show which risks were evaluated and which still require project-specific review.
Plan Sensor Placement and Data Collection
Sensor placement should answer the design question. The number and location of sensors depend on the payload, packout geometry, likely thermal gradients, and risk assessment. A sensor placed only in the box air space may not represent the product environment. A sensor near a coolant component may show a local cold condition that does not describe the payload center.
Potential locations include:
Helpful decision tools
Check the details before you choose packaging
These quick tools can help you compare route risk, sizing needs, coolant choices, and packaging details before you request a quote.
Ice Pack Calculator
Estimate gel ice pack quantity for chilled shipments and practical route planning.
Estimate ice packsInsulation Material Reference
Compare insulation material choices for different cold chain packaging needs.
Compare materialsInsulation Material Drop Resistance
Review drop resistance and handling factors before choosing insulation materials.
Check resistance- Payload center;
- Payload edge;
- Location most exposed to a coolant component;
- Location farthest from the coolant;
- Internal air space;
- Between payload and insulation;
- Outside the package for ambient reference;
- Other locations justified by the test plan.
The sensor plan should identify:
- Sensor model or device ID;
- Calibration or verification status, when applicable;
- Sensor location and orientation;
- Sampling interval;
- Start and stop times;
- Time zone;
- Data logger or software used;
- File name of the original data export;
- Method used to review and summarize the data.
The sensor position should be shown in the packout drawing or photograph. If a sensor is moved after loading, disconnected, or found to be outside its intended position, record the event and its effect on interpretation. Do not silently edit the data or redraw the configuration to match the result.
Keep the original data export, not only a screenshot or manually edited chart. The chart used in an article should show units, time axis, sensor labels, and enough context for a reader to understand what is being displayed. A public chart should not reveal confidential customer information, but it should not remove the conditions needed to interpret the result.
Set Acceptance Criteria Before Reviewing Results
Acceptance criteria should be approved before the test result is reviewed. The decision rule should define the temperature window, evaluation period, sensors included, treatment of excursions, and conditions for pass, conditional approval, repeat testing, or failure.
A clear acceptance section includes:
| Acceptance field | Question to answer |
| — | — |
| Temperature limits | What minimum and maximum values apply? |
| Evaluation period | Which part of the test is included in the decision? |
| Sensor basis | Which sensor locations are used? |
| Excursion treatment | How are short excursions or sensor noise treated? |
| Repeat requirement | When is a repeat test required? |
| Deviation rule | What happens if conditioning or loading differs from plan? |
| Configuration scope | Which payload and packout version does the result cover? |
| Approval authority | Who makes the final technical or quality decision? |
Do not change the acceptance criteria simply because the curve is inconvenient. If the criteria are found to be unsuitable, close the current test record, document the reason for revision, and define a new test or analysis path. This preserves the difference between an observed result and a post-hoc decision.
The acceptance criteria should also state whether the result is suitable for design iteration, internal approval, customer review, or shipment release. These are different decisions. A result that supports a design direction may not support a general performance statement or production release.
Analyze the Test Without Overstating the Result
Analysis should begin with data integrity and scope. Confirm that the raw file is complete, sensor labels match the test plan, the time axis is correct, and deviations are recorded. Then compare each relevant sensor with the approved acceptance criteria.
The report should summarize:
- Minimum and maximum readings by sensor, where relevant;
- Time spent inside or outside the defined window, if that metric is approved;
- Differences between sensor locations;
- Start and end conditions;
- Environmental exposure;
- Deviations from the planned configuration;
- Missing or questionable data;
- Repeat-test requirements;
- Decision and technical rationale.
Avoid presenting a single minimum or maximum as the complete story. A local reading near a coolant component may not represent the payload. Conversely, a payload-center sensor may not identify a boundary risk. The report must explain which readings matter for the acceptance decision and why.
Use project-specific language when the evidence is project-specific. Appropriate wording includes “The tested configuration remained within the defined evaluation window under the recorded conditions” only when the record supports that statement. It is not appropriate to convert the same result into “This packout protects all pharmaceutical shipments for 48 hours.”
A public article without a real test record should explain the analysis method and reporting fields rather than display invented values. This M21 article is therefore a documentation guide, not a substitute for an actual validation report.
Document Deviations, Anomalies, and Repeat Tests
A professional validation record does not hide deviations. It explains them. Examples include an incorrect conditioning duration, a sensor placed outside the planned position, a delayed closure, an opened package, a logger interruption, an unexpected ambient change, or a component substitution.
For each deviation, record:
- What happened;
- When it happened;
- Which component or measurement was affected;
- Whether the deviation was corrected;
- Whether the test remained interpretable;
- Who reviewed the deviation;
- Whether a repeat test is required.
A repeat test should not be described as a failure merely because the first test was inconclusive. The report should distinguish among failed acceptance, invalid or incomplete data, conditional result, and design iteration. Those categories lead to different next actions.
If a configuration is changed after a test, assign a new revision or explain why the change does not affect the validated scope. Changes to payload mass, insulation, coolant quantity, placement, conditioning, closure, or loading sequence may require a new review. A new photograph alone does not establish that a changed configuration has the same result.
What a Publishable Validation Summary Should Include
When a real test is approved for public use, the publishable summary should contain enough context to be useful without exposing confidential information. It should identify the project scope, configuration, conditions, measurement plan, result type, and limitations.
A publishable summary may include:
- Anonymous project or application description;
- Target temperature range;
- Payload category and non-confidential load description;
- Packout configuration image or diagram;
- Conditioning and sensor-position summary;
- Test date or period, when publishable;
- Environmental or route profile;
- High-level result within its defined scope;
- Technical limitation and non-extrapolation statement;
- Related Tempk solution, tool, validation, or custom-packaging link.
It should not include a customer name, product identifier, route, image, chart, or result without permission. A redacted case is still a real case only when the underlying record exists and the approved public summary can be traced back to it.
If no approved test exists, publish a method article like this one instead. Do not create a fictional project, synthetic temperature curve, sample pass result, or placeholder testimonial to make the page look more authoritative.
Cold Chain Packout Validation Checklist
Use this checklist before closing a test record:
- The test objective is written in one specific sentence.
- The payload type, mass, dimensions, packaging, and starting condition are recorded.
- The approved temperature range and excursion rule are documented.
- The packout configuration has a version number.
- The insulation, thermal-control components, placement, and barriers are recorded.
- Conditioning equipment, timing, starting state, and loading sequence are documented.
- The route or environmental exposure is defined.
- Sensor IDs, locations, sampling interval, and time zone are recorded.
- Original data files are retained.
- Acceptance criteria were established before result review.
- Deviations, anomalies, and data gaps are documented.
- The conclusion is limited to the tested configuration and conditions.
- A qualified reviewer has approved the result or next action.
- Public-use permission is recorded for any photo, chart, project detail, or quotation.
Final Takeaway
A cold chain packout test becomes useful when it is traceable, repeatable, and limited to what the evidence actually supports. The most important record is not the chart alone. It is the connection between the shipment requirement, payload, complete configuration, conditioning method, environmental exposure, sensor plan, acceptance criteria, raw data, deviations, and approval decision.
For Tempk, this documentation approach supports the broader path from shipment profile to packout concept, sample review, conditioning, thermal testing, and project-specific confirmation. It also keeps technical content honest: a method can be published without pretending that the company has tested every route or achieved a universal hold-time. When a real project becomes available and publication is authorized, its evidence can be added as a separate case-specific page with its own scope and limitations.
For a project that needs help defining the shipment profile, documenting the packout, preparing a validation plan, or reviewing a custom configuration, visit Tempk’s [Custom Cold Chain Packaging](https://www.tempcontrolpack.com/custom-cold-chain-packaging/) pathway.